
As a Linux admin, the first tool I reach for when a new device appears on my network is SSH.
For anyone familiar with SSH, you’ll need a few things.
- A remote user to connect with
- A remote SSH server
- A public/private key pair of the correct type
- Permission on that server to log in
In order to use SSH, there are a few things you’ll want to configure on your NAS.
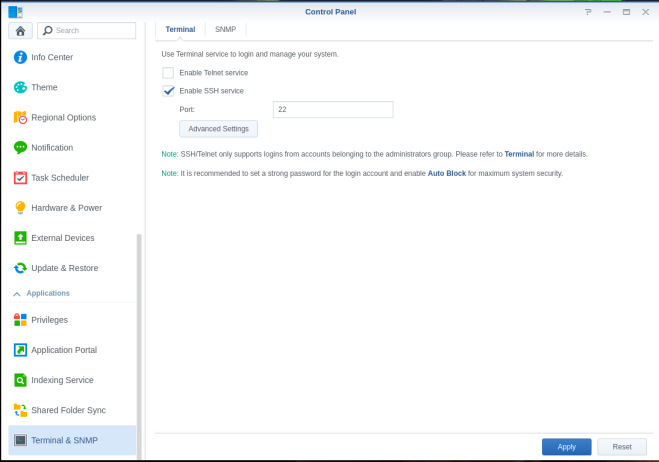
Enable the SSH service
From the Synology Web console…
- Open the control panel
- Scroll down to Terminal & SNMP
- Change the port number to suit taste.
- Check “Enable SSH service”.
- Click Apply.
Test the SSH service.
In this example, my Synology NAS hostname is yoda. My username is myork.
Attempt to log in from the command line
$ ssh myork@yoda
The authenticity of host 'yoda (192.168.0.241)' can't be established.
ECDSA key fingerprint is SHA256:9v9azyqMIubJzRlIeJbo45Snr6jkZaRLAC5QGM56jn8.
Are you sure you want to continue connecting (yes/no/[fingerprint])? yes
Warning: Permanently added 'yoda,192.168.0.241' (ECDSA) to the list of known hosts.
myork@yoda's password:
$
Configure SSH keys
Generate the SSH public and private key pair.
$ ssh-keygen
Generating public/private rsa key pair.
Enter file in which to save the key (/home/myork/.ssh/id_rsa):
/home/myork/.ssh/id_rsa already exists.
Overwrite (y/n)? y
Enter passphrase (empty for no passphrase):
Enter same passphrase again:
Your identification has been saved in /home/myork/.ssh/id_rsa.
Your public key has been saved in /home/myork/.ssh/id_rsa.pub.
The key fingerprint is:
SHA256:gKak7Eza2WkuEETS/8L4tlmbMGS4SP0taPrXGhb1GGY myork@fedoralaptop.local
The key's randomart image is:
+---[RSA 3072]----+
|oo               |
|...  .           |
|. ..o .E         |
|oo.+. +.+        |
|.=o+oo .S.       |
|Bo.*=.+          |
|o+++**o.         |
|  +o+*o+         |
| ..+=o+          |
+----[SHA256]-----+
Copy the ssh key to the Synology NAS.
$ ssh-copy-id myork@yoda
/usr/bin/ssh-copy-id: INFO: attempting to log in with the new key(s), to filter out any that are already installed
/usr/bin/ssh-copy-id: INFO: 1 key(s) remain to be installed -- if you are prompted now it is to install the new keys

Number of key(s) added: 1

Now try logging into the machine, with: "ssh 'myork@yoda'"
and check to make sure that only the key(s) you wanted were added.
Log into the server. Notice you are still asked to enter a password. This is because depending on how your home directory was created, the permissions need to be corrected.
$ ssh 'myork@yoda'
myork@yoda's password: ########
Correct the permissions on the home directory. Replace myork with your username.
$ sshuser="myork"
$ chown myork:users /volume1/homes/${sshuser}/
$ chown myork:users /volume1/homes/${sshuser}/.ssh
$ chown myork:users  /volume1/homes/${sshuser}/.ssh/authorized_keys
$ chmod 755 /volume1/homes/${sshuser}/
$ chmod 700 /volume1/homes/${sshuser}/.ssh
$ chmod 600 /volume1/homes/${sshuser}/.ssh/authorized_keys
(Thanks to Jamie for pointing out my silly copy/paste errors)
Update the SSHD config file to allow remote login. First, your user will need to be in the “Administrator” group to elevate privileges. This can be done via the Synology GUI.

You can now elevate privileges using the sudo command. We need to make sure the following lines are uncommented. If they don’t exist, they should be added. I’m using vim as it’s my favourite editor. Just replace it with your preference.
$ sudo cp /etc/ssh/sshd_config /etc/ssh/sshd_config.backup
$ sudo vim /etc/ssh/sshd_config
RSAAuthentication yesPubkeyAuthentication yes
Then restart the ssh daemon.
$sudo synoservicectl --reload sshd
You should now be able to log in without a password to your new Synology workstation.

### There are errors in your syntax ###
# your CLI commands should be:
$ sshuser=”myork”
$ chown myork:users /volume1/homes/${sshuser}/
$ chown myork:users /volume1/homes/${sshuser}/.ssh
$ chown myork:users /volume1/homes/${sshuser}/.ssh/authorized_keys
$ chmod 755 /volume1/homes/${sshuser}/
$ chmod 700 /volume1/homes/${sshuser}/.ssh
$ chmod 600 /volume1/homes/${sshuser}/.ssh/authorized_keys
# first three ‘chmod’ should be ‘chown’
# last two ‘chmod’ commands should just be 700 and 600
LikeLike
Thanks Jamie, fat fingers. Apologies!
LikeLike
The comments say to restart sshd but the command says “–reload”. In my case, reload was not enough and a restart was required. This can be done in the admin UI by unchecking/applying/checking the box next to Enable SSH Service in Control Panel -> Terminal
LikeLiked by 1 person
Thanks Alessandro. I’ll update the guide to make sure no-one else hits the same issue.
LikeLike