Should I buy a second-hand camera or lens from eBay ?

My experiences of buying camera gear on eBay

Some context

I wanted to write a little post on some things I’ve learned about buying second-hand cameras and lenses from Ebay.
I’ve bought maybe 5 lenses and lots of other equipment from eBay and I wanted to share my experiences.
I had a Nikon d5100 that my wife and I shared, and I quickly realised that I was getting into this photography thing. After some time, I realised the kind of photography I do would benefit from a full-frame camera, and the choice of lenses was amazing.

Disclaimer: Looking back, the limitations I had weren’t with my camera, but were with the 18-270 Tamron lens in low light conditions, and my ability to understand the limitations of a variable aperture lens in low light.

I’ve since bought a nikon d810 and numerous lenses, tripods, heads, lighting, modifiers and many other accessories on ebay.

Things I look for when buying a camera on eBay

The shutter count/number of actuations

When looking at a camera, this is one thing that is likely to influence the price. Before going any further, it’s worth understanding why people obsess over it so much.

In summary, the shutter is a mechanical component that will wear out over time. It happens. It’s also the case that it’s something that’s hard (if not impossible) to replace yourself. Having said this, it actually means that the higher shutter count, the more chance there is of the shutter failing. This number will vary between cameras, and I strongly suggest you check somewhere like here (for my d810) to check what the chances of failure are at a particular shutter count.

http://www.olegkikin.com/shutterlife/nikon_d810.htm

Capture
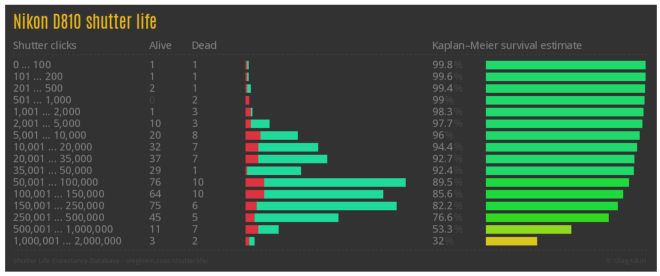
Looking at the example of a d810, I probably wouldn’t buy one with 150’000 actuations, but I wouldn’t think twice about picking up one with 20’000 actuations.

A big caveat to this is if it’s been replaced and has supporting paperwork.

Condition of the body

Another thing when buying a second-hand body is “how well has it been treated in a previous life”?

I care because if someone has looked after the body, drying it off after it’s been in the rain, washing corrosive salt spray off the body, and repairing broken rubber grips tells me the last owner cared about it. I can make a reasonable expectation that they have probably put it in a well-padded bag, or even that it’s just been stored away and not used very much. These are things I look for.

Boxes, and paperwork

A camera that’s had a hard life isn’t always a bad thing, you can get some great deals on ex-pro equipment, and if there is good paperwork to back it up, then that is definitely worth looking at.  Loved ex-pro gear is great. If they have the boxes, that will help any resale and is pretty positive when buying.

Grey Imports

It’s worth asking if the camera/lens is a grey import, although in the UK (where I live), I  don’t consider it a real concern.
Grey imports are a big discussion, but primarily it means that because your camera/lens was bought in another country, the manufacturer will pretend you don’t exist.
This can include
  • No official in-country warranty
  • No deals/ rebates
  • Lower resale value
  • In some countries, you’ll struggle to get it repaired as “official repair shops” won’t touch it under threat from the manufacturer

In the UK, we have a wonderful company called Fixation who just repair things. Give them a call if you are unsure https://www.fixationuk.com/

Note: I have no connection with them, other than being a huge fan and a customer.

Bidding, offers and buy it now

So to keep it simple, you should know what an item is worth when you look for it.

Bidding

Bidding provides the biggest chance of getting a good deal, just have a ceiling price in advance and do not go above it. The last 60 seconds is the only time that matters. Do not chase an item, ever.

Offers

Making offers has been a really good way of getting gear at a good price. You are taking the hassle and delay away from the seller, but annoying them with under par prices will get you ignored pretty quickly.

Buy it now

If an item is on at a decent price for buy it now, check very carefully why. If it’s a commercial seller, they will be making a profit somewhere. Make sure you aren’t paying too much, or that the product has some small print that says “for spares only”.

Know what it costs elsewhere

Often a new grey import is cheaper than the buy it now prices on eBay. I’ll be honest, eBay is my last option and usually based on price.
Some places I usually check in the UK
As well as your local camera shop (these guys deserve our support too).

Things I look for when buying a Lens on eBay

  1. Know exactly what you are looking for, know the age of the lens and common issues with those lenses.
  2. Look for worn lettering around the barrel (which doesn’t mean for sure, but may indicate heavy/pro usage). If this is the case, ask for some detail around servicing paperwork. Nothing wrong with a well-used lens if it’s been loved.
  3. Look for the magic words “no fungus, optically perfect”. If you see this, it means you have some recourse if that turns out not to be the case.
  4. Personally, I look for the original box and accessories because it makes resale easier if I choose to ditch it.
  5. Check the postage and understand how it’ll be transported. You want absolute clarity if it doesn’t arrive. Offer to pay for better carriage if it’s going to save you having a broken lens.
  6. Where is it being transported from? If it’s in your own country, you may be better picking it up personally.
  7. Please feel free to disagree here, but there is a lot less to go wrong with a prime, than a zoom, or something with VR.
  8. Know what a new grey market lens would cost. Second hand Nikon 24-70 f2.8 was going for £1400 on eBay, £1299 shipped from Digital rev.
  9. Know where you can get them repaired even if out of warranty/grey. In the UK we are lucky to have fixation who repair anything. https://www.fixationuk.com/
Happy hunting, I’ll update this blog as I get time to add more.
Should I buy a second-hand camera or lens from eBay ?

Using a Synology host for NFS file mounts with Fedora 31.

Often I use NFS as a simple way to keep my home directory consistent across multiple (and ephemeral) VM’s at a time. The Synology NAS makes this really easy.

Enable NFS on your Synology NAS.

The default NFS version is v3, v4 can be enabled. I’m using v3 for this demonstration.  Open the control panel and check the “enable NFS” box.

control-panel1

Create an NFS export on the Synology NAS.

Create a new shared folder and give it a name and select a volume to back it.

control-panel2

You can encrypt the folder if you wish.

control-panel3

You can use the back end Synology features such as file compression and quotas.

control-panel4

Make a note of your settings. As this has a folder of “nfsexports” and it’s on “volume3”, my NFS export path will be “/volume3/nfsexports”

control-panel5

You can add specific users for security, I usually configure a specific host to have access. I also squash users.

control-panel7

I’m now in a position where I can mount the NFS volume on my Fedora server. The only issue is that Fedora will be expecting NFS v4 out of the box, and i’m running v3.

To resolve this I edit the NFS client configuration on my server to expect v3 by default. This can also be done on the command line with options

The config file options are

[root@hansolo nfs]# grep -v ^# /etc/nfsmount.conf
[ NFSMount_Global_Options ]
Defaultvers=3
Nfsvers=3

The command-line test is

 mount -t nfs -o nfsvers=3 192.168.0.241:/volume3/nfsexports /mnt -vv

At this point I can go back to the Fedora cockpit and mount my nfs volume

Log in to cockpit as the administrative user

cockpit-1

Click on Storage and select NFS mounts

fedora-1

Specify the mount credentials

fedora-2

Then check it’s been mounted

fedora-3

It’s as simple as that.

Any, and all comments welcome.

Matt –


Using a Synology host for NFS file mounts with Fedora 31.

Use iSCSI block storage from your Synology NAS, with Fedora.

iSCSI has become something of a staple in the world of Linux block storage. It’s quick, it’s reliable I wouldn’t consider it the most secure option but it does “just work”.

I often use iscsi block storage for persistent container storage, as well as a cheap way to add more disk to my VM.

This used to be something of a chore, with iscsiadm and manually copying and pasting long target names, trying to keep track of what is where. Remembering what order to do things, and testing over and over. The Cockpit package within Fedora makes this totally simple now.

This walkthrough will show you how to use your Synology NAS with Fedora 31 to mount remote storage within minutes. NOTE: I’m not using CHAP authentication, as this is just for my own vm’s. In a production environment, you should be using “at least” CHAP.

Ok, what you will need – a volume on your NAS and a local area network. Ideally a Fedora (https://getfedora.org/) vm to test.

Configure the LUN on the NAS

The LUN is the block of storage you want to present. The target is the device that will present that storage to the rest of the network.

Create the LUN

Log into the Synology NAS as an administrator and select the iscsi manager icon.

iscsi-manager

Click on LUN, and create.

Give your LUN a meaningful name, and select how much space you want to allocate from the Synology Volume.

iscsi-manager-2

In order to access the LUN you are creating, you’ll need a target. This can be done at the same time by selecting “Create a new iscsi target”.

iscsi-manager-3

Here you can give your target a sensible name, and the complex “iqn” name will be generated automatically. If you were running a production system you would enable chap authentication at this point on the target.

iscsi-manager-4

Now that is finished, we can see our target with a mapped LUN. How simple was that?

iscsi-manager-6


Configuring the client (the Linux box)

In your web browser, connect to your Fedora server with your administrative user. I’m connecting as root for testing, but ideally, this should be your user with SUDO privileges,

cockpit-1

Once logged in, click on the storage tab and scroll down to iscsi targets. This is a list of iscsi targets that your Linux box is aware of. As we don’t have any, we’ll need to add a target and scan for available LUNS.

cockpit-2

To scan for LUNS on a target, click the + button and you’ll be asked for a server address. This is the IP, or hostname of your synology server. Click Next to start scanning.

cockpit-3

Here you can see a list of targets that it’s found. You are probably wondering why we see 3 targets when we only created 1 ? Well, we have IPv6 enabled so they all present the same lun, it’s just a mixture of ipv4 and ipv6 interfaces. As I use ipv4, i’ll be selecting that one and clicking add.

cockpit-4


When we now look at our storage drivesin cockpit, we can see a new disk drive. This is the LUN we selected in the previous step. It can be formatted and treated like any other disk.

cockpit-5

Click on the new Synology drive and you can create a partition table on that disk.

cockpit-6

Personally, I like ext4 and I’ve chosen to zero the disk. I’ll be mounting it on  /home/iscsi

cockpit-9

When this completes, you’ll have a 1gb drive mounted from your synology server to the directory /home/iscsi of 1gb. As seen below.

cockpit-11

That’s it. A really simple, effective way to add more disks to a VM or physical hosts without having to touch a screwdriver.

Please let me know if you have any comments or feedback.

Matt


Use iSCSI block storage from your Synology NAS, with Fedora.

Automatic backups to a USB disk on your Synology NAS

Context

I’m a hobbyist photographer and I have about 30’000 images that I keep on my Synology drive. My NAS is a core part of my workflow, but bad things do happen. If they do, I still need to be able to access my images while I’m getting my NAS repaired, or replaced.

I don’t have time to do any of this manually, so I’ve automated the process of backing up my images once a week or on-demand from my NAS to my external USB disk.

You will need…

  1. A USB disk large enough to hold all your images. Ideally, a disk that you can leave plugged in for an extended period of time.
  2. A Synology NAS
  3. Some photos
  4. Shell access to your Synology NAS drive.


For this example, I will be using the username “myork” and my NAS is called “yoda”.


Setup Steps

Plug your external USB drive into the back of your Synology NAS. If it is a USB 3 device, be sure to use the blue USB ports if available.

You should be able to see it in the external drives tab of your Synology NAS web console.

external-disk-settings

here you can see it’s been mounted automatically and a new shared folder called usbshare1 will now be visible in your folder list.

disk-list


Collect the information about your files and your external disk.

Log into your Synology web console and ensure SSH is enabled.

enable-ssh

Once the service has been enabled, you can then ssh into the Synology NAS.

ssh myork@yoda
...
myork@yoda:~$

As we know the drive is mounted under the name “usbshare1” we can get the full path from the ssh console.

myork@yoda:~$ mount | grep -i usbshare | awk '{print $3}'
/volumeUSB1/usbshare

The result tells us where the Synology OS has mounted the disk on “/volumeUSB1/usbshare”. Now we need to locate all of our photos.

Fortunately, we can do this from the Synology web console. Open the file browser and get the properties of your photo folder.

get-vol-name


Make a note of the location. In my case it is /volume1/photo.

Now, we can use a tool called rsync to help up backup our files.


The command will look like

/bin/rsync -avzh /volume1/photo /volumeUSB1/usbshare/


where /volume1/photo is the source of my files, and /volumeUSB1/usbshare/ is the destination (my external USB disk).


Create the task

In the control panel of the Synology web console, click “Task Scheduler”

udscript

Give the task a useful name and run it as your own user. Do not use root as this is the UNIX/Linux super-user and any mistake could damage your system. In my case, I’m using the myork user.

run-user

Click the task settings tab, and put the command into the “user-defined script” box. Feel free to get it to email you if you want that. The option around abnormal termination relies upon the command exiting with a non-zero exit code, which will work with rsync.

runscript-command

Now select when you’d like this to run. Please bear in mind that a disk copy could take some time to run, so you’ll probably want to run this once a week, or maybe daily.

runwhen

You can then attempt a test run of your script and see if your backups are created.

test-run

That’s about it. If you find this useful, or your have any suggestions, please let me know.

Thanks

Matt

Automatic backups to a USB disk on your Synology NAS

A Linux Admins guide to using Synology NAS

Recently I replaced my Synology DS1815+ for a DS1819+. I decided to rebuild from scratch (while migrating my data). I’ve used Synology for about 10 years and I’ve also got a strong background in Linux, so I decided to write a series of articles that describe how I use my Synology NAS with my Linux desktop.

I should make it clear that Fedora & Red Hat are my distro of choice, although most of what I will demonstrate is transferrable to other distributions.

Disclaimer, I work for Red Hat, but this is a personal blog not affiliated with them in any way. My thoughts and blogs are my own.

I encourage, and welcome feedback. If something doesn’t work, doesn’t make sense, then please feel free to reach out to me.

Posts

Configure the SSH server on your Synology NAS.

Automatic USB backups from your Synology NAS

Using Synology for iscsi block storage with Fedora

Using your Synology NAS for NFS with Fedora 31

A Linux Admins guide to using Synology NAS

Configure the SSH server on your Synology NAS.

As a Linux admin, the first tool I reach for when a new device appears on my network is SSH.

For anyone familiar with SSH, you’ll need a few things.

  1. A remote user to connect with
  2. A remote SSH server
  3. A public/private key pair of the correct type
  4. Permission on that server to log in

In order to use SSH, there are a few things you’ll want to configure on your NAS.

Enable the SSH service

From the Synology Web console…

  1. Open the control panel
  2. Scroll down to Terminal & SNMP
  3. Change the port number to suit taste.
  4. Check “Enable SSH service”.
  5. Click Apply.

enable-ssh

Test the SSH service.

In this example, my Synology NAS hostname is yoda. My username is myork.

Attempt to log in from the command line

$ ssh myork@yoda
The authenticity of host 'yoda (192.168.0.241)' can't be established.
ECDSA key fingerprint is SHA256:9v9azyqMIubJzRlIeJbo45Snr6jkZaRLAC5QGM56jn8.
Are you sure you want to continue connecting (yes/no/[fingerprint])? yes
Warning: Permanently added 'yoda,192.168.0.241' (ECDSA) to the list of known hosts.
myork@yoda's password: 
$

Configure SSH keys

Generate the SSH public and private key pair.

$ ssh-keygen  
Generating public/private rsa key pair.
Enter file in which to save the key (/home/myork/.ssh/id_rsa): 
/home/myork/.ssh/id_rsa already exists.
Overwrite (y/n)? y
Enter passphrase (empty for no passphrase): 
Enter same passphrase again: 
Your identification has been saved in /home/myork/.ssh/id_rsa.
Your public key has been saved in /home/myork/.ssh/id_rsa.pub.
The key fingerprint is:
SHA256:gKak7Eza2WkuEETS/8L4tlmbMGS4SP0taPrXGhb1GGY myork@fedoralaptop.local
The key's randomart image is:
+---[RSA 3072]----+
|oo               |
|...  .           |
|. ..o .E         |
|oo.+. +.+        |
|.=o+oo .S.       |
|Bo.*=.+          |
|o+++**o.         |
|  +o+*o+         |
| ..+=o+          |
+----[SHA256]-----+

Copy the ssh key to the Synology NAS.

$ ssh-copy-id myork@yoda
/usr/bin/ssh-copy-id: INFO: attempting to log in with the new key(s), to filter out any that are already installed
/usr/bin/ssh-copy-id: INFO: 1 key(s) remain to be installed -- if you are prompted now it is to install the new keys

Number of key(s) added: 1

Now try logging into the machine, with: "ssh 'myork@yoda'"
and check to make sure that only the key(s) you wanted were added.

Log into the server. Notice you are still asked to enter a password. This is because depending on how your home directory was created, the permissions need to be corrected.

$ ssh 'myork@yoda'
myork@yoda's password: ########

Correct the permissions on the home directory. Replace myork with your username.

$ sshuser="myork"
$ chown myork:users /volume1/homes/${sshuser}/
$ chown myork:users /volume1/homes/${sshuser}/.ssh
$ chown myork:users  /volume1/homes/${sshuser}/.ssh/authorized_keys
$ chmod 755 /volume1/homes/${sshuser}/
$ chmod 700 /volume1/homes/${sshuser}/.ssh
$ chmod 600 /volume1/homes/${sshuser}/.ssh/authorized_keys

(Thanks to Jamie for pointing out my silly copy/paste errors)

Update the SSHD config file to allow remote login. First, your user will need to be in the “Administrator” group to elevate privileges. This can be done via the Synology GUI.

ssh-admin-user

You can now elevate privileges using the sudo command. We need to make sure the following lines are uncommented. If they don’t exist, they should be added. I’m using vim as it’s my favourite editor. Just replace it with your preference.

$ sudo cp /etc/ssh/sshd_config /etc/ssh/sshd_config.backup
$ sudo vim /etc/ssh/sshd_config
RSAAuthentication yes PubkeyAuthentication yes

Then restart the ssh daemon.

$sudo synoservicectl --reload sshd

You should now be able to log in without a password to your new Synology workstation.

Configure the SSH server on your Synology NAS.

RHEL8 – Where did my network scripts go ?

In RHEL8 the old network scripts have been deprecated. However, if you want you can addd them back in.

Red Hat have provided them in a package called network-scripts

$ sudo yum install network-scripts.x86_64

This adds all your favourite scripts back in

$ sudo rpm -ql network-scripts
/etc/rc.d/init.d/network
/etc/sysconfig/network-scripts
/etc/sysconfig/network-scripts/ifcfg-lo
/etc/sysconfig/network-scripts/ifdown
/etc/sysconfig/network-scripts/ifdown-bnep
/etc/sysconfig/network-scripts/ifdown-eth
/etc/sysconfig/network-scripts/ifdown-ippp
/etc/sysconfig/network-scripts/ifdown-ipv6
/etc/sysconfig/network-scripts/ifdown-isdn
/etc/sysconfig/network-scripts/ifdown-post
/etc/sysconfig/network-scripts/ifdown-routes
/etc/sysconfig/network-scripts/ifdown-sit
/etc/sysconfig/network-scripts/ifdown-tunnel
/etc/sysconfig/network-scripts/ifup
/etc/sysconfig/network-scripts/ifup-aliases
/etc/sysconfig/network-scripts/ifup-bnep
/etc/sysconfig/network-scripts/ifup-eth
/etc/sysconfig/network-scripts/ifup-ippp
/etc/sysconfig/network-scripts/ifup-ipv6
/etc/sysconfig/network-scripts/ifup-isdn
/etc/sysconfig/network-scripts/ifup-plip
/etc/sysconfig/network-scripts/ifup-plusb
/etc/sysconfig/network-scripts/ifup-post
/etc/sysconfig/network-scripts/ifup-routes
/etc/sysconfig/network-scripts/ifup-sit
/etc/sysconfig/network-scripts/ifup-tunnel
/etc/sysconfig/network-scripts/ifup-wireless
/etc/sysconfig/network-scripts/init.ipv6-global
/etc/sysconfig/network-scripts/network-functions
/etc/sysconfig/network-scripts/network-functions-ipv6
/usr/lib/.build-id
/usr/lib/.build-id/df
/usr/lib/.build-id/df/fce1383c3b10c1e20c4e4684d16a35c65cad1d
/usr/sbin/ifdown
/usr/sbin/ifup
/usr/sbin/usernetctl
/usr/share/doc/network-scripts
/usr/share/doc/network-scripts/examples
/usr/share/doc/network-scripts/examples/ifcfg-bond-802.3ad
/usr/share/doc/network-scripts/examples/ifcfg-bond-activebackup-arpmon
/usr/share/doc/network-scripts/examples/ifcfg-bond-activebackup-miimon
/usr/share/doc/network-scripts/examples/ifcfg-bond-slave
/usr/share/doc/network-scripts/examples/ifcfg-bridge
/usr/share/doc/network-scripts/examples/ifcfg-bridge-port
/usr/share/doc/network-scripts/examples/ifcfg-eth-alias
/usr/share/doc/network-scripts/examples/ifcfg-eth-dhcp
/usr/share/doc/network-scripts/examples/ifcfg-vlan
/usr/share/doc/network-scripts/examples/static-routes-ipv6
/usr/share/doc/network-scripts/sysconfig.txt
/usr/share/man/man8/ifdown.8.gz
/usr/share/man/man8/ifup.8.gz
/usr/share/man/man8/usernetctl.8.gz

Feedback welcome as always!

RHEL8 – Where did my network scripts go ?

Configure Packer and Vagrant on RHEL8 with libvirt

I’ve finally gotten around to installing RHEL8 as my primary desktop. One of my main use cases is to automatically build and configure vm’s using vagrant for testing.

A few things are subtly different on RHEL8, so I thought i’d share my learning (and some of the hacks i’ve put in place until I can investigate further).

Installation

Install Prerequisites

sudo yum -y install libvirt  \
                    libvirt-devel  \
                    ruby-devel  \
                    libxslt-devel \ 
                    libxml2-devel  \
                    libguestfs-tools-c  \
                    ruby-devel  \
                    gcc

Start the libvirt service

sudo systemctl enable --now libvirtd

Download packer into a Packer subdirectory (customise to taste)

mkdir ~/Packer
cd ~/Packer
curl -o ./packer.zip https://releases.hashicorp.com/packer/1.4.1/packer_1.4.1_linux_amd64.zip
unzip packer.zip

Download vagrant CentOS rpm (I’l probably tweak this later, but it works fine for now)

mkdir ~/Vagrant
cd ~/Vagrant
curl -o  vagrant_2.2.4_x86_64.rpm https://releases.hashicorp.com/vagrant/2.2.4/vagrant_2.2.4_x86_64.rpm

sudo yum install -y ./vagrant_2.2.4_x86_64.rpm

Install the vagrant libvirt plugin

CONFIGURE_ARGS='with-ldflags=-L/opt/vagrant/embedded/lib with-libvirt-include=/usr/include/libvirt with-libvirt-lib=/usr/lib' GEM_HOME=~/.vagrant.d/gems GEM_PATH=$GEM_HOME:/opt/vagrant/embedded/gems PATH=/opt/vagrant/embedded/bin:$PATH vagrant plugin install vagrant-libvirt

Test your vagrant project by specifying the provider

vagrant up --provider=libvirt

The following worked fine for me, let me know if you get any issues.

References

https://github.com/vagrant-libvirt/vagrant-libvirt#provider-options


Configure Packer and Vagrant on RHEL8 with libvirt

Configure LDAP authentication for Red Hat Cloudforms.

Background

So recently I was asked to configure a small lab that would be using Red Hat Cloudforms with users from LDAP (IDM/FreeIPA).  I had to look up a number of documents and ended up referring back to some old notes. To that end, I decided it would make sense to document it here with screenshots for anyone that may find it useful.

Architecture

Server configurations

For this, you’ll need 1 LDAP server (Red Hat IDM in my case), preconfigured with at least one user and group. You’ll also need one Cloudforms virtual appliance capable of connecting to the IDM server.

So the demo lab I’ll be doing this in is actually my home lab (yes I run IDM at home for my wife and kids).

User Configurations

I will create a single LDAP group called “cloudforms-super-users”. It will contain my user “matt”. I’ll configure it to be a super admin on cloudforms.

The “svc-cloudforms-ldap-auth” user will be used by the Cloudforms application to bind to IDM. It’s a service account with minimal privileges to allow querying for users and groups.

Preparing Cloudforms

Connect cloudforms to the LDAP server

We log into cloudforms as the default admin/smartvm user.

Screen Shot 2017-05-23 at 13.42.57

We now go to configuration

Screen Shot 2017-05-23 at 13.03.47

We configure cloudforms to use the LDAP server.

On the Authentication tab, set the mode to LDAP, and the user type to UID (this is for IDM/FreeIPA). Then

Screen Shot 2017-05-23 at 13.31.45

Screen Shot 2017-05-23 at 13.31.51

Create the new cloudforms LDAP -> CF Role group

We create a new group in cloudforms that maps to a role and LDAP group.

On the left hand panel, click on Access Control -> Groups.

Screen Shot 2017-05-23 at 13.32.56

Click “configure “Add a new group.”

Screen Shot 2017-05-23 at 13.33.06

You’ll then be prompted to add a new group.

Here we give the name of our new group, select a cloudforms role to map, and a tenant.

We also supply an LDAP user that is in the appropriate LDAP groups already.

The username is the bind name.

Screen Shot 2017-05-23 at 13.34.30.png

When that is complete, we are provided with a list of LDAP groups we can select to complete the mapping.

Screen Shot 2017-05-23 at 13.35.02

Test the new LDAP user.

Log out

Screen Shot 2017-05-23 at 13.36.00

Log in as our new LDAP user.

Screen Shot 2017-05-23 at 12.44.25

Check we have the correct role mapping.

Screen Shot 2017-05-23 at 14.01.20

Profit.


Configure LDAP authentication for Red Hat Cloudforms.

Configure Ansible Tower to support FreeIPA / IDM LDAP Authentication

Background

So if you’ve bought Ansible tower, it’s probably because you needed the enterprise features such as an API, or RBAC support that you only get with Ansible Tower.

So I’ve been building a small lab for some of the people in my team. A key component of this lab is Ansible Tower. I knew Tower would fully support LDAP as an authentication source, however, when I checked out the docs, most of the examples are for Microsoft Active Directory. Although in many businesses this would be great, I work for a Linux company, and my default is Red Hat IDM (FreeIPA to everyone else).

I’m no expert when it comes to LDAP, I’ve had a little bit of experience, but, if I’m being honest I’ve avoided it in general.

I’ve written this because it took a while to get working perfectly, so it made sense to document it for me, maybe someone else might find it useful.

Use Case

My use case was to create a user group in IDM and allow members of that group to be able to log into Ansible tower. I’m not particularly worried about automatically assigning organisations, I just want to make sure people can log in, I’ll assign permissions as and when I choose. This is about Authentication, not Authorization.

domain name                   - nixgeek.co.uk
IDM administrator credentials - admin/letmein123
idm host                      - idmng.nixgeek.co.uk

Step 1 – Create a user in IDM

If you haven’t already done so, make sure you are authenticated as an administrator user.

[root@idmng ~]# kinit admin
Password for admin@NIXGEEK.CO.UK:

Then create a new IDM user.

[root@idmng ~]# ipa user-add tower_admin
First name: Tower
Last name: Administrator
------------------------
Added user "tower_admin"
------------------------
User login: tower_admin
First name: Tower
Last name: Administrator
Full name: Tower Administrator
Display name: Tower Administrator
Initials: TA
Home directory: /home/tower_admin
GECOS: Tower Administrator
Login shell: /bin/sh
Principal name: tower_admin@NIXGEEK.CO.UK
Principal alias: tower_admin@NIXGEEK.CO.UK
Email address: tower_admin@nixgeek.co.uk
UID: 477200012
GID: 477200012
Password: False
Member of groups: ipausers
Kerberos keys available: False


Step 2 – Create a user group in IDM

[root@idmng ~]# ipa group-add tower_administrators
----------------------------------
Added group "tower_administrators"
----------------------------------
Group name: tower_administrators
GID: 477200013

Step 3 – Add the newly created user to my user group in IDM

root@idmng ~]# ipa group-add-member tower_administrators --users=tower_admin
Group name: tower_administrators
GID: 477200013
Member users: tower_admin
-------------------------
Number of members added 1
-------------------------

Step 4 – On tower install  the ldap client tools

root@tower ~]# yum install openldap-clients


Step 5 – Update the authentication settings on Tower

On tower 3.x edit the file /etc/etc/tower/conf.d with your favourite editor

[root@tower ]# vi /etc/tower/conf.d/ldap.py

Step 6 – Comment out the Active Directory imports

Below the comments at the top of the file, you will see the following

from django_auth_ldap.config import LDAPSearch, LDAPSearchUnion
from django_auth_ldap.config import ActiveDirectoryGroupType

Comment out the ActiveDirectory line, and insert the GroupOfNamesType import so it looks like the following.

from django_auth_ldap.config import LDAPSearch, LDAPSearchUnion
#from django_auth_ldap.config import ActiveDirectoryGroupType
from django_auth_ldap.config import GroupOfNamesType

Step 7 – Configure the LDAP URI

Still in the ldap.py file you will find a line that starts with the token AUTH_LDAP_SERVER_URI.

Assuming you haven’t changed any ports, then modify to look similar to the following. This just tells Tower how to open a connection to the IDM/IPA server.

AUTH_LDAP_SERVER_URI = 'ldap://idmng.nixgeek.co.uk:389'

By default IPA/IDM allows LDAP connectifvity without forcing LDAPS. LDAPS is beyond the scope of this guide. I may add it later if there is an interest.

Step 8 – Configure the LDAP Bind

The next token we are looking for is AUTH_LDAP_BIND_DN. This Token tells Tower how to talk with the IPA/IDM server.

Here I’m putting the credentials of my IDM admin user in. Please don’t do this in the wild, putting your IDM admin password in plaintext is NOT_A_GOOD_IDEA(TM)

AUTH_LDAP_BIND_DN = 'uid=admin,CN=users,CN=accounts,DC=nixgeek,DC=co,DC=uk'
AUTH_LDAP_BIND_PASSWORD = 'letmein123'

Step 9 – The user search

So the next token is the query that will be executed against the IDM server to establish if users are valid. By default, this is configured for Active directory, and will need to be changed for IDM/IPA.

You will need a block that looks similar to the following.

AUTH_LDAP_USER_SEARCH = LDAPSearch(
'cn=users,cn=accounts,dc=nixgeek,dc=co,dc=uk', # Base DN
ldap.SCOPE_SUBTREE, # SCOPE_BASE, SCOPE_ONELEVEL, SCOPE_SUBTREE
'(uid=%(user)s)', # Query

Let’s look at this line by line

Execute an LDAP search against our IDM server

AUTH_LDAP_USER_SEARCH = LDAPSearch(

Specifying the path to our user accounts

'cn=users,cn=accounts,dc=nixgeek,dc=co,dc=uk', # Base DN

Querying subtrees of that path

ldap.SCOPE_SUBTREE, # SCOPE_BASE, SCOPE_ONELEVEL, SCOPE_SUBTREE

for a specific element that has the uid (username attribute in IDM/IPA) that matches the supplied username.

'(uid=%(user)s)', # Query

Step 10 – The group search

Next, we need to configure the group search

AUTH_LDAP_GROUP_SEARCH = LDAPSearch(
'cn=groups,cn=accounts,dc=nixgeek,dc=co,dc=uk', # Base DN
ldap.SCOPE_SUBTREE, # SCOPE_BASE, SCOPE_ONELEVEL, SCOPE_SUBTREE
'(objectClass=ipausergroup)', # Query
)

Step 11 – Ensure valid users MUST be members of our group

By setting the following, we can ensure valid users are both valid users, and also members of the correct group to log in. This means we can grant and revoke access to Tower by just adding and removing from a group.

AUTH_LDAP_REQUIRE_GROUP = 'cn=tower_administrators,cn=groups,cn=accounts,dc=nixgeek,dc=co,dc=uk'

That’s it, now save and exit the file.

Step 12 – Restart tower

[root@tower ~]# ansible-tower-service restart


Step 13 – Log in and profit!

You are now ready to log in and test.

I hope you found this useful. If you find any inaccuracies please let me know, and i’ll update them.

Versions of software

Red Hat IDM  / FreeIPA -4.4.0
RHEL 7.3
Ansible Tower 3.0.3


Configure Ansible Tower to support FreeIPA / IDM LDAP Authentication